Fitting Super Sport Bonnet Scoop to your +4 or 4/4
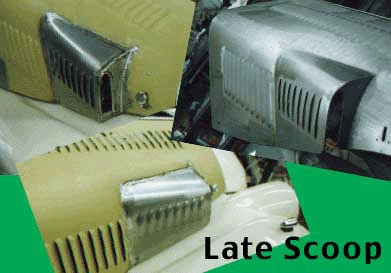
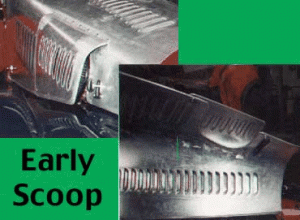
 Several times a week we are asked, “What about air cleaners for my +4?”. There are a few different options that one can consider. The first thing to do is measure the amount of clearance you have between the front carb and the bonnet. There are a few rare cars that seem to have enough clearance( about 2”) to fit a pair of thin, round Stelling & Hellings air cleaners. These particular air cleaners also may fit if you combine the short manifold used with the H6 carbs with the Stromberg or HS6 carbs. If you’re like most, you don’t have the luxury of enough clearance and another option is to fit a box like contraption that is very narrow in the front and tapers towards the back. There you fit a single air cleaner. Some people have had success with these, others have not. The problem is that the box starves the front carb and the car doesn’t run well. Thus, we’re left with the option of installing a Super Sport style bonnet scoop. Now, most people aren’t sure how it would look on their +4 so I have attached photo’s of a recent installation done here atMorgan Spares. These pictures show the step-by-step process of having the bonnet cut to fit the scoop. The early style is riveted on and the later style is welded on. With this scoop, a pair of K&N filters will fit nicely on the SU’s. You also now can run the Webers you’ve always dreamed of…
Fitting Morgan Spares Updated Temp Gauge With Replacement Sender
The original temperature sender for the +4 Morgan has not been available for years so we here at Morgan Spares Ltd. have come up with a solution. We change the internals only in your old temp gauge with a modern smiths unit and supply a voltage stabilizer and new sender. The sender fits in the existing radiator fitting so no modification is needed to be done to the radiator.
200-767 Cream Gauge
200-768 Black Gauge

Morgan +4, 4/4, +8, Aero 8 Car
Wiring Diagrams
Whole Car, Restoration, Component, Rebuild, Show Restoration
Conversion from Positive (+) ground to negitive (-) ground
Convert positive (+) ground to negitive (-) ground
•Disconnect battery
•Switch wires on Amp Gauge
•Switch cables on battery so that the negative terminal is now to ground
•Switch wires on coil so that the negative terminal goes to the distributor
*If you are doing this conversion in order to install our alternator kit then the next two instruction do not apply*
•Re-polarize generator field: take wire from live (positive) source and touch it to field terminal 3 times. Should see small spark. Reconnect generator field wire
•If Generator is in working condition and Ampmeter fluctuates wildly, not showing + charge, then voltage regulator will need to be replaced. This happens very rarely but sometimes the regulator keeps its old polarity and will not switch.
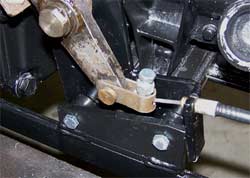
Installing a new hand-brake cable with a mechanical retainer instead of a soldered brass end
The pictures below are of a 4/4
On a new cable installation:
• Un-attach the cable clevis at the rear axle
• Un-attach the cable clevis at the hand-brake lever
• Remove the old cable from the car
• Unsolder the brass end from the cable at the gearbox end. Remove the clevis and on a +4 the transmission through bolt from the cable.
• On the new cable remove the clevis and brass end and discard the brass end
• On a +4 install the transmission through bolt onto the new cable
• *Note* The new cable retainer has a small ball bearing in the bottom of the hole. If you remove the retaining bolt make sure that the ball does not fall out.
• Install the new cable retainer into the clevis from the new cable and reinstall the clevis with the cable retainer onto the cable making sure that the cable protrudes through the retainer a small amount and clamp the retainer bolt down hard to lock the cable in place.
• Reinstall the cable into the car attaching first the cable to the hand-brake lever
• Reattach the cable at the rear axle
• Use the adjuster in the rear axle so that the hand brake works properly.
+4 Alternator Install Instructions
Warning: The battery must be set to Negative ground for this kit to work
If the your car needs to be converted from Positive ground to Negative ground it can be done in about 30 minutes. Click here for our online instructions for this conversion.
Installation of the alternator is straight forward. Remove the generator from the engine. Bolt the alternator to the bracket with the 3/8 bolt provided making sure that the flat washers supplied are under the head of the bolt and under the nyloc nut. The spacer needs to be between the rear tab of the bracket and the rear tab of the alternator. Do not tighten until the belt is installed and tensioned properly. Replace the original adjuster bracket on the water pump with the new one provided. Install fan belt, adjust the tension on the belt and tighten the adjuster bolt and the lower alternator mount bolt.
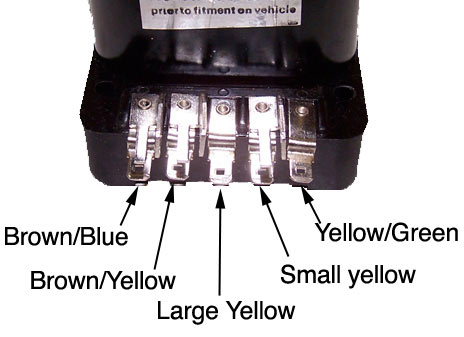
Wiring hookup:
The large yellow wire connects to either one of the large terminals on the alternator and the yellow/green wire attaches to the small terminal on the alternator.
Replace your regulator with the new “dummy” regulator and connect the wiring as shown. The black ground wires are not used and can be taped back against the harness.
+4 5 Speed Install PDF Instructions
Vapor Lock
Fuel system vapor lock happens when fuel in the inlet line side of the fuel pump boils or vaporizes before you want it to. This would cause the fuel pump to not be able to move the fuel from the tank to the carburetor, creating stalling, or intermittent running at idle. If it were to happen, it would probably be when the engine is idling hot on a very warm summer day.
The reason it is uncommon on newer cars is that the fuel pump is located in the rear of the car and the fuel system is under higher pressure when it enters the engine compartment, which increases the boiling point of the fuel in the lines. Contrasted with fuel being pulled into the engine compartment on cars with a mechanical pump on the engine, which lowers the boiling point in the fuel lines.
Some things to help correct the problem, if it is vapor lock, would be to check the routing of the fuel line between the firewall face and the pump. Keep it as far away from the engine block and exhaust system as possible. Insulating the line in the engine compartment would also help. Another thing to consider is a low pressure electric fuel pump mounted in the rear of the car by the fuel tank to push the fuel into the engine compartment instead of pulling it.
Another thing to consider is summer and winter blends of gasoline are adjusted to have different vapor pressures. This is done so that at low temperatures fuel will vaporize to burn efficiently, and during summer months it doesn’t need to be as volatile at higher temps. If you had a winter blend of gas in the tank on a 90º day, it could really create an issue, but not many of us top up the tank in New England at -10ºF, only true enthusiasts.
Also possible is that the engine is not vapor locking and starving for fuel. Next time try holding the throttle wide open, just until it starts. Note: only press the pedal down and hold it once as repeating will pump extra gas in each time, creating more of a problem if the hard starting is due to richness. Notice what comes out of the tailpipe. If it is a black cloud, that means you have a rich condition.
If the problem has happened over a period of time, it could be a carb issue. As always before spending any money, try to diagnose it as carefully as possible.